 Meadhall
Getting started
From nothing to a working group: sign in, start or join a group, invite people, hand out roles, and bring the Meadhall bot into your Discord server.
Which steps are yours. Joining a group someone else runs: 1, 2 and 3, then 8. Setting one up for your CP, clan or guild: 1 and 2, then 4 to 7.
1. Sign in with Discord
Meadhall has no passwords of its own: you sign in with your Discord account. All you need is a Discord account.
- Open meadhall.app/hub (or press Open the hub on the front page). Signed out, the hub shows three example groups (Example CP, Example alliance, Example guild); press Sign in with Discord on any of their pages, or Sign in in the orange strip at the top (or open your account page,
#me). - On Your account, press Sign in with Discord. Signing in means you accept the terms of service and have read the privacy policy.
- Discord asks whether Meadhall may know who you are, your email address and which servers you're in (Meadhall uses the servers only to suggest groups to join, under From your Discord, and keeps none of them: privacy policy). Authorise it.
- You're signed in, back on the page where you pressed Sign in (a group link, or a join link from Discord), or on your account page if you started there. You stay signed in on that browser for 30 days from signing in; after that, sign in again.
If Discord sends you back with "Signing in didn't finish. Try again.", press the button again; see the FAQ if it keeps happening.
2. Set up your profile and characters
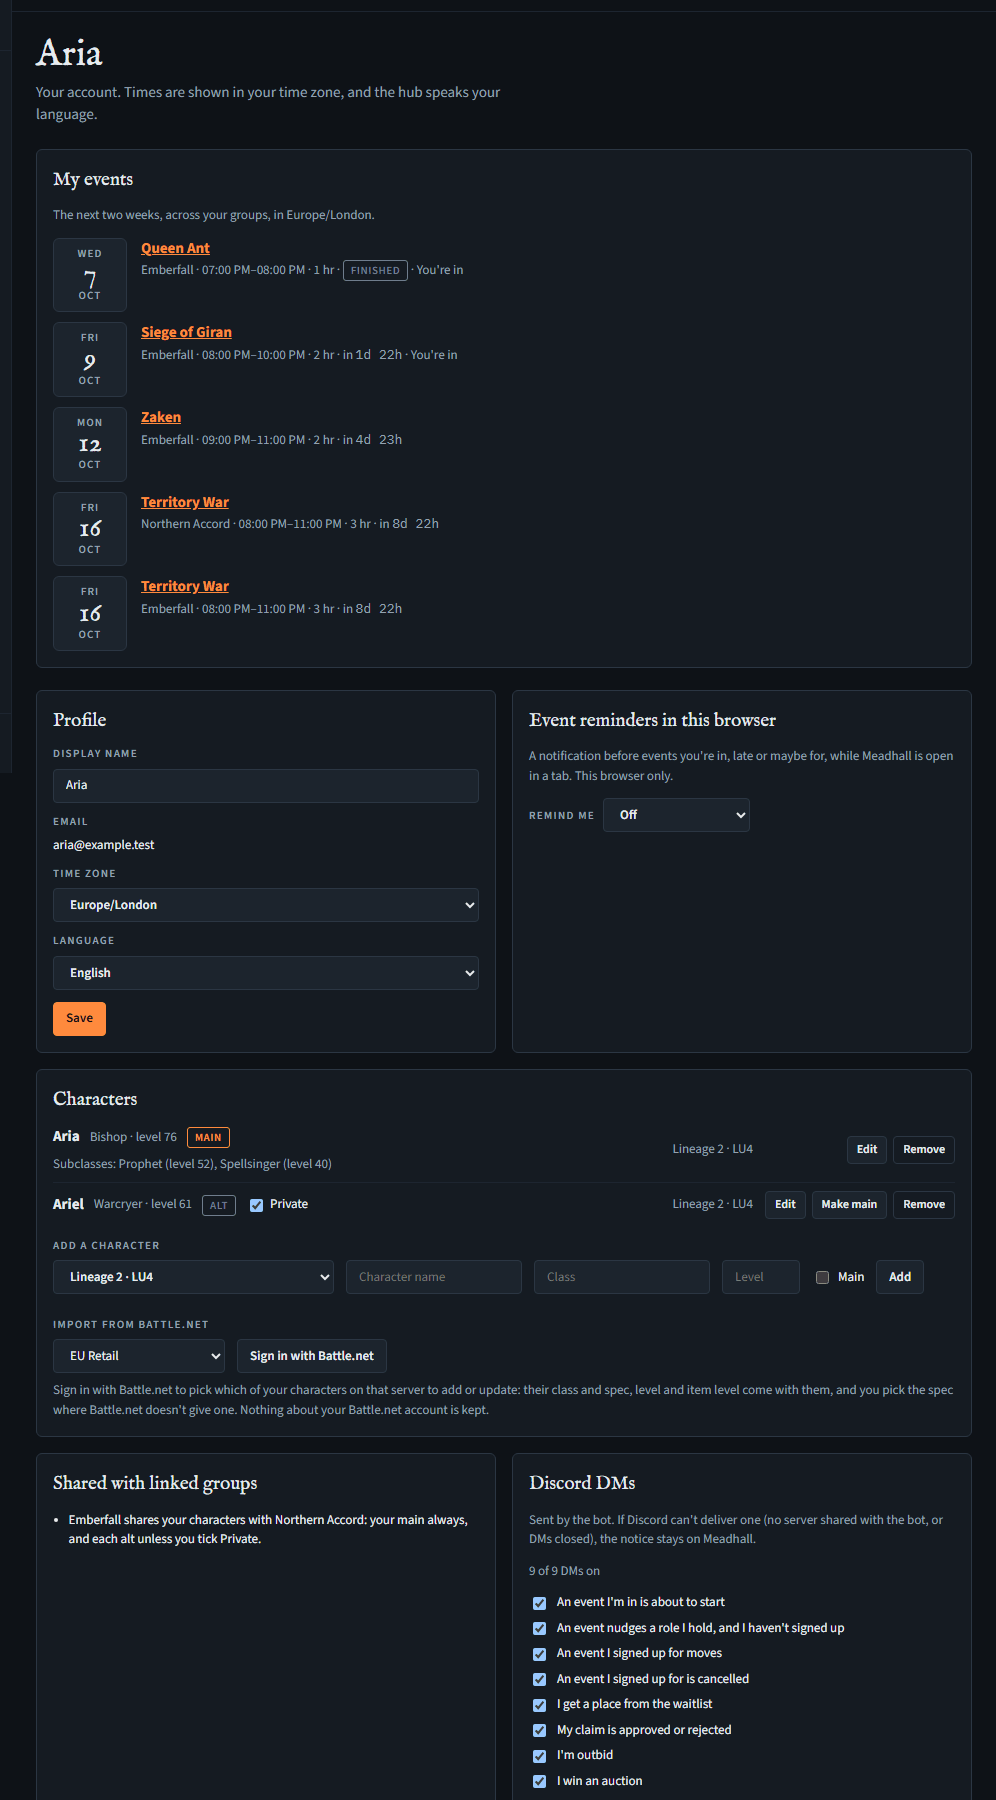
On your account page (Your account, with your name, at the bottom of the menu, or #me):
- Under Profile, check your Display name (Discord's name to start with), pick your Time zone and Language, and press Save. Every time in the hub is shown in your time zone.
- Under Characters, add the characters you play: pick the game and server, type the Character name, pick the Class (the suggestions are that game's classes), enter the Level, and tick Main if it's the one you play most. Press Add.
Characters are how you sign up for events (as one of them), and what the group's Stats page counts. You can add them later too, and change one's name, class or level with Edit, or pick another main with Make main, on its line. A Lineage 2 character's Subclasses are added there too: Edit, then Add a subclass for each one (up to three), with its class and level (from 20, where subclasses start), and Save.
3. Join your group with a code
Anyone signed in. You need a joiner code from an officer of the group.
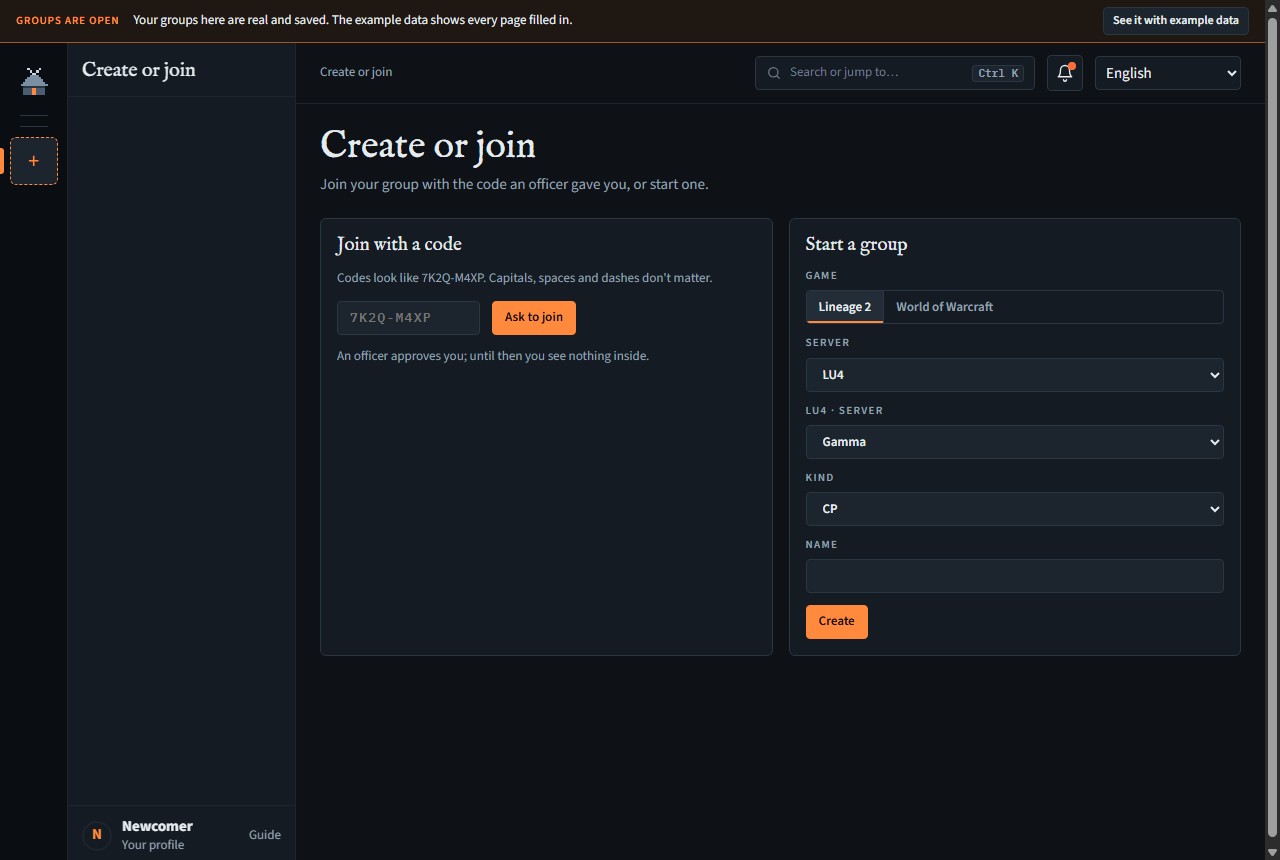
- Press + at the bottom of the left rail (Create or join a group). Signed in and in no group yet, the hub opens this page by itself.
- Under Join with a code, type the code. Codes look like
7K2Q-M4XP; capitals, spaces and dashes don't matter. - Press Ask to join. You'll see "You've asked to join … An officer will look at it.", and the request waits under Waiting for an officer.
- Until an officer approves you, you see nothing inside the group. Once approved, its crest appears in the left rail.
If a group has linked a Discord server you're on, Create or join may also list it under From your Discord, with Ask to join: that sends a request, or lets you straight in where the group allows it. Changed your mind? Press Withdraw beside the waiting request. If the group has linked its Discord server, you can also ask from Discord: /join code, or the Request to join button the bot offers (see the bot).
4. Or start a group
Anyone signed in. You become the group's leader. You can be in up to 20 groups at once.
- On Create or join, under Start a group, choose the Game: Lineage 2 or World of Warcraft.
- Pick the Server and the Kind of group (below). Lineage 2's servers come in three groups: LU4; More servers, by name; and Any other server, by version (see Lineage 2 servers below). A Lineage 2 CP or clan also picks its server's world (on LU4: Gamma, Black, White or Carmine). A World of Warcraft guild or raid team can type its Realm; it's optional, since a raid team can come from several realms, and can be set later in Settings. WoW Forever has rulesets instead of realms: type the ruleset (Normal, PvP, Roleplaying or Hardcore). Each line offers its own classes: Classic has no Demon Hunter or Evoker, and Classic Era, Hardcore, Season of Discovery, Anniversary and WoW Forever have the nine original classes with their three talent trees (a bear-tanking druid is Guardian Druid). Type a Name (up to 40 characters), and press Create.
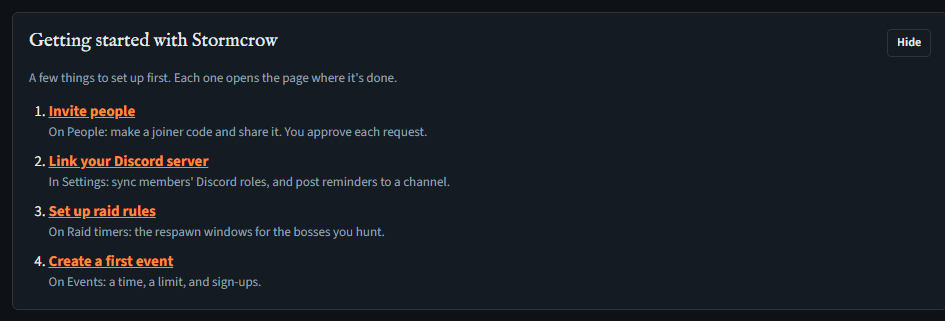
- The page now shows Getting started with …: a checklist of first steps, each a link to the page where it's done. Hide it with Hide when you're done (this browser remembers).
Lineage 2 servers
A server is a project and its version, and the version decides the classes a character there can have: Interlude has LU4's classes without its Geomancer and Terramancer; Kamael and High Five add the Kamael race (Trooper, Warder, Doombringer, Judicator and the rest).
| Server | Version | A CP or clan picks |
|---|---|---|
| LU4 | LU4's own | Gamma, Black, White or Carmine |
| Reborn | By world: Interlude on Signature x1 and Eternal x10, High Five on Origins | Signature x1, Eternal x10 or Origins. Every kind of group on Reborn picks one, alliances too, since the world decides the classes. |
| ElmoreLab | Interlude | Erica x3 or Teon x1 |
| ElmoreLab Kamael | Kamael | Bartz x3 or Lionna x5 |
| Asterios | High Five | x5, Prime x1, Medea x3 or Hunter x55 |
| Scryde | High Five | Nothing to pick: it opens new worlds every few weeks, so type yours if you like (optional) |
| E-Global | High Five | MW x1 |
| Other server (Interlude, Kamael or High Five) | The one you choose | Nothing to pick: type the server's name (1 to 32 characters). Every kind of group on Other types it, alliances too. |
An alliance picks no world, as on LU4, except on Reborn, where it picks one, and on Other, where it types the server's name. The world or name can be changed later in Settings; the server can't, and on Reborn neither can the version: Signature x1 and Eternal x10 swap for each other, Origins for neither. A character on Reborn is added on its world (Lineage 2 · Origins (Reborn)), which decides its classes too.
The servers after LU4 are new. Events, DKP, loot, auctions, stats and people work on every server. The tools (the alchemy planner and the rest), the Clan page, LU4's elemental raid feed and reading a claim's screenshot are LU4's alone, so a group on another server doesn't see them. Their Raids page starts empty and lists the bosses the group adds, from the epics most versions share (adding a boss). Loot items are typed there, as there's no item list to suggest from.
Kinds of group
| Game | Kind | Its pages |
|---|---|---|
| Lineage 2 (LU4) | CP (constant party) | Dashboard, Events, Raid timers, DKP, Loot, Auctions, Stats, People, Settings, Tools; Clan too while it's linked under a clan, showing that clan's page |
| Lineage 2 (any other server) | CP, Clan, Alliance | The same as on LU4, without Tools or the Clan page |
| Lineage 2 (LU4) | Clan | The same as a CP, without Auctions |
| Lineage 2 (LU4) | Alliance | Dashboard, Events, Alliance roster, Alliance DKP, Drops, Prices, DKP, Drop fairness, Raid timers, Stats, People, Settings, Tools; CPs and clans link under it (Alliances), and its events can be sent to them (Events) |
| World of Warcraft (EU or US: Retail, Classic, Classic Era, Hardcore, Season of Discovery, Anniversary or WoW Forever) | Guild, Raid team | Dashboard, Events, Raid timers, DKP, Loot, Auctions, Stats, People, Settings |
World of Warcraft is early. You can create a guild or raid team and use events (with soft reserve), DKP, EPGP or loot council, the loot log, auctions, people, stats and raid lockouts (the Raid timers page: who's locked to which raid now, on every line but WoW Forever, whose raids open in December).
The kind can't be changed later, and it decides what the bot's /setup offers you: it lists the kinds of group you can link: ones you lead, or whose Discord link your role manages (see step 7).
5. Invite people
Needs the Joiner codes permission to make codes and Approve join requests to let people in. Officers and leaders have both.
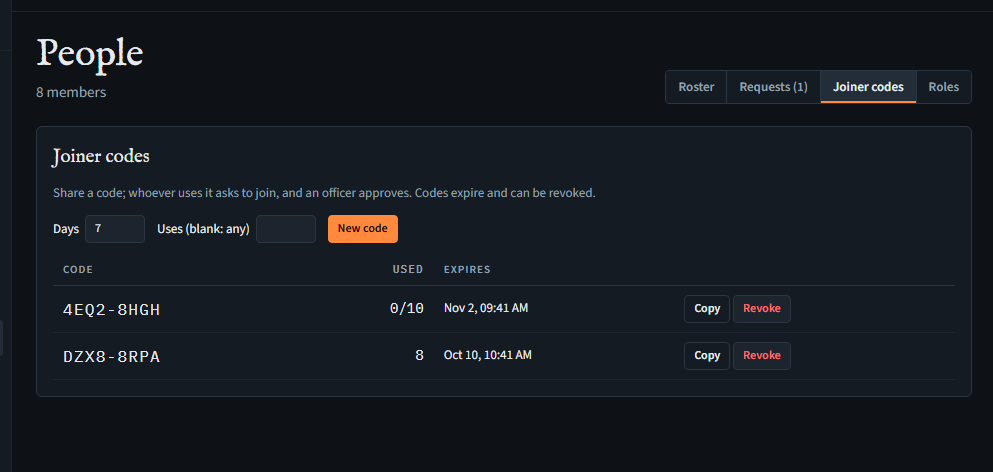
- Open the group's People page and the Joiner codes tab.
- Set how many Days the code lasts (1 to 90, 7 to start with) and, if you like, how many Uses (blank: any). Press New code.
- Press Copy beside the code and share it with your people (it copies the code itself, not a link). They follow step 3.
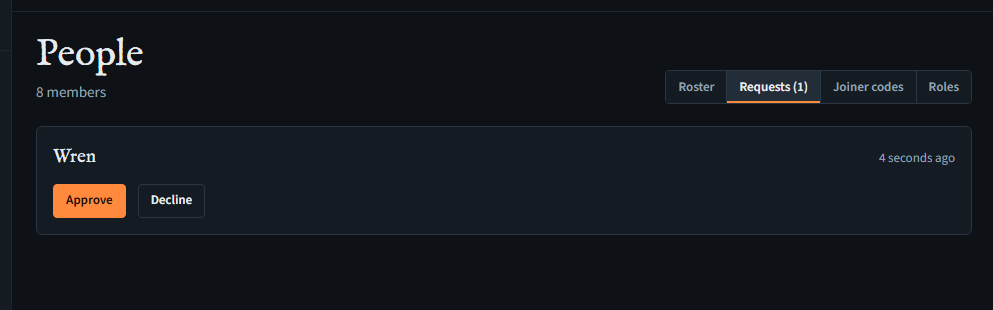
- Requests arrive on the Requests tab, with a count on the Dashboard. Press Approve or Decline. A request that came from your Discord server says in our Discord.
- A code you no longer want: press Revoke; it stops working at once.
6. Hand out roles
Every group has a leader (who can do everything, including deleting the group), and two roles to start with, Officer and Member, which a leader can edit. You can add your own roles (a Raid lead, a Treasurer) with just the permissions they need. New members join as members.
- On People, Roster tab, press Roles… on someone's row, tick their roles and press Save.
- To make someone a leader too, press Make leader (leaders only).
What each role may do, and how to make your own: Groups, people and roles.
7. Bring in your Discord server
Needs Manage the Discord link in Meadhall (leaders, unless they give it to a role) and Manage Server on the Discord server.
There are two separate things, and you can use either or both:
- A channel for reminders (a Discord webhook, on every plan): the event reminders you ask for, and raid windows opening on a paid plan (Plans), are posted there.
- The Meadhall bot in your server: members use Meadhall from Discord with slash commands (
/home,/event,/dkp,/claim…), events, raid windows and auctions are posted in your announcements channel, and roles can come from Discord.
A channel for reminders
- In Discord, open the channel's settings: Integrations, Webhooks, New Webhook, Copy Webhook URL.
- In Meadhall, open the group's Settings. Under Discord channel, paste the URL and press Connect.
- Press Send a test message and check the channel. Disconnect stops it.
The bot: add it to your server
- In the group's Settings, under Discord server, press Link Discord server.
- Discord asks which server to add Meadhall to (only servers where you have Manage Server are offered), then shows what the bot asks for: View Channels, Send Messages, Embed Links, Pin Messages and Create Events (used only if you add events to the server's Events: the bot). Choose the server and authorise.
- You're back on Settings with "Discord server linked." The bot is now in the server. With those permissions left ticked, Discord has made it a Meadhall role holding them; with some unticked, the role has only the rest, and with all unticked there's no role at all.
/setup's last step checks what it can do and says what's missing. - If a channel it will post in is private, or denies them, give the Meadhall role those permissions in that channel's Permissions (no role: make one in Server Settings, Roles, and give it to the bot). For role sync, drag the Meadhall role above the roles it hands out (Server Settings, Roles) and give it Manage Roles.
Added the bot some other way (the Add to Discord button on the home page or the bot's page, or a bot list)? Go straight to /setup: it links the server to your group.
The bot: choose its channels with /setup
In any channel of that server, type /setup. The wizard is private (only you see it) and has five steps:
- Kind: "What are you linking?" One button per kind of group you can link (you lead it, or your role manages its Discord link): Alliance, Clan, CP, Guild, Raid team. Can link only CPs and you'll see only CP. None and it says so, with a link to create one.
- Group: pick which of your groups of that kind this server is for.
- Channels: Announcements (events, raid windows, auctions) and Officers (claims, join requests, who left) are required; Loot (drops and splits) and Log (the changelog) are optional. Next stays grey until both required channels are chosen.
- Who's in: optionally a Discord role that marks your group's people ("With a group role, only people holding it do"), and Joining from Discord: Off: codes only, Request: an officer approves (the default) or Automatic: anyone who meets the rule.
- Check and link: a summary and a check of each channel (✓ Can post in #announcements, or what's missing). Press Link …. Anything that fails can be fixed afterwards; press Check again.
Once linked, the wizard turns green, and the bot posts "This server is linked to …" in your announcements channel, asking members to sign in once with Discord.
You can set the same things on the site instead: Settings, Meadhall in your Discord (it appears once the server is linked). You can also set Registration reminders there to Off, Every 3 days or Weekly. With Automatic joining and a group role selected, Meadhall privately sends the registration link to people who hold that Discord role but are not yet in the hub. And you can tick Add each event to the server's Events too, so each event the bot posts also appears in the server's Events, where everyone on the server sees it (the bot); that one is on the site only. Run /setup again, or use /settings, to change the other settings later; registration reminders are in /settings too.
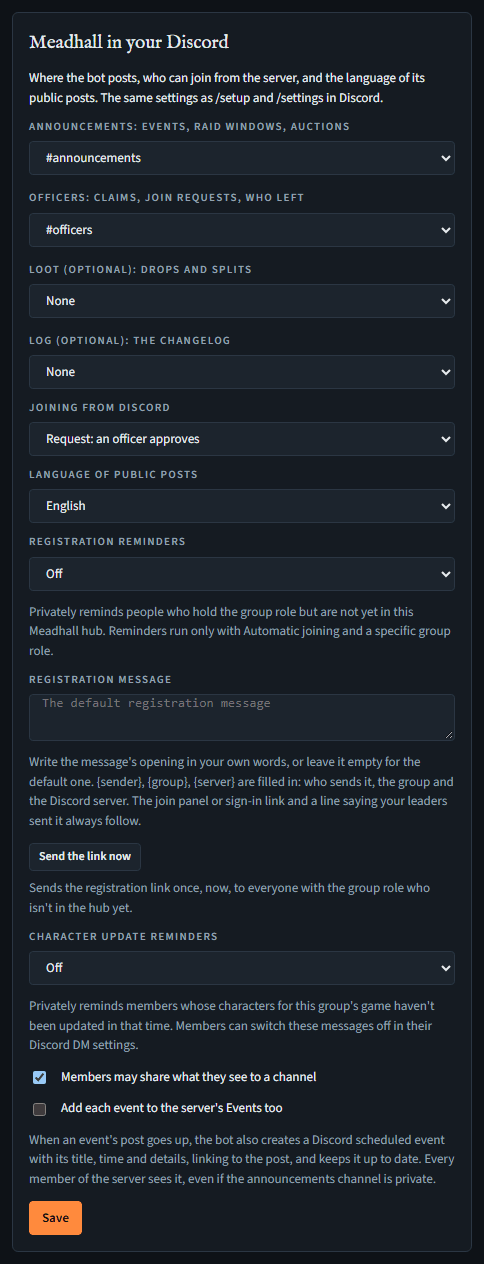
/setup, plus registration reminders and Send the link now, and character update reminders.Post a join panel
So newcomers on your server can join without a code, post a join panel: a public message with your group's crest, name and a button to join, or ask to, as Joining from Discord says.
- In Discord,
/settings, Post a join panel; or on the site, Settings, Join panel. - Choose the channel (the announcements channel to start with) and whether to pin it (the bot then needs Pin Messages there).
- Add a line for newcomers if you like ("CP Ember, LU4, sieges Tue and Sun"), and post it.
It keeps itself up to date; posting again replaces it. See the bot's join panel for what it shows.
8. What your members do
- Sign in to Meadhall once with Discord (step 1). That's how the bot knows who they are; there's no separate linking step.
- Join the group with a code (step 3), or from Discord if you allowed it.
- In your server, try
/helpto see what the bot offers them, and/home nowfor what needs them.
What next
- Set your bosses' rules and record a kill: Raid timers.
- Make your first event: Events and attendance.
- Set up DKP pools and activities: DKP and claims.
- Every bot command: The Discord bot.
Every table in the hub sorts: press a column's heading to sort by it (numbers biggest first, names A to Z), and again to turn it round. Empty cells stay at the bottom, and the table keeps its order when the page refreshes it.